Hello my creative friends! Today I want to share with you how to use the Floral cut files from Wild Whisper Designs to make a mixed media art panel. I will also be using some of my favorite mixed media products in the creation of this art panel.
Wild Whisper has some beautiful papers and stamps, but were you aware that the also have a great range of cut file images? What I love the most about these images is that they can be sized to fit the scale of the project that you are creating. I love the versatility and how they can be used in so many different applications. My challenge for myself was to use only the floral cut file for images on this mixed media art panel.
The Mixed Media Project
Please view the video below for a step-by-step tutorial on how to use the Wild Whisper Floral Cut Files in this mixed media art panel. The techniques in this video include Gelli printing, decoupage and application of Pan Pastels.
Making Gelli Prints

The first step for this project was to use an 8x 10 Gelli plate for making prints. My main image for the printing is the floral SVG from Wild Whisper Designs.
Using my Brother ScanNCut I resized and cut several different sizes of these floral images keeping them in scale with the size of my Gelli plate.
For these prints I chose 3 colors to use: Turquoise Blue, Cerulean Blue and Iridescent Gold. I varied the colors, images and paint application to have variation in the texture, design and color for these prints. For every application of paint, I made 2 prints to give me a greater variety of images to work with. If you don’t have a electronic die cutting machine, you can also use the Wild Whisper Designs Floral Stamp Set to get a similar result. To see the details of these prints, please see the video above.
Choosing your Surface
For this project, I am using an 8” by 10” art panel. I purposely chose this size because it is the same dimensions as my Gelli Plate.
If you find using canvases intimidating, I suggest trying art panels. Art panels are inexpensive. They are made of canvas wrapped around a board and usually double primed. This is an easy way to gain confidence working on a piece without feeling intimidated by a larger canvas. These art panels can be framed, left as is, or used as a book cover.
Adhering the Print to the Panel

Using Golden semi-gel soft gloss or another gel medium, apply gel liberally to the panel with a brush. Place the Gelli print on top and smooth down with your hands. There may be bubbles between the print and the panel. Use your fingers to try to smooth out these bubbles.
Add a layer of gel medium on top of the Gelli print to seal in the print. Sometimes the edges might lift. If this happens, gently life the print, add more medium between the print and the board. Press down to seal. You should end up with a print that is completely covered with a thin layer of gel medium. Set the panel aside to dry and clean your brush thoroughly.
Cleaning Up Panel Edges
Once the panel is dry, cut or tear the excess paper away from the panel edges. If you have small bits of paper along the edges that you would like to smooth down, use gel medium to adhere them to the edges of the panel.
Adding Die Cut Images

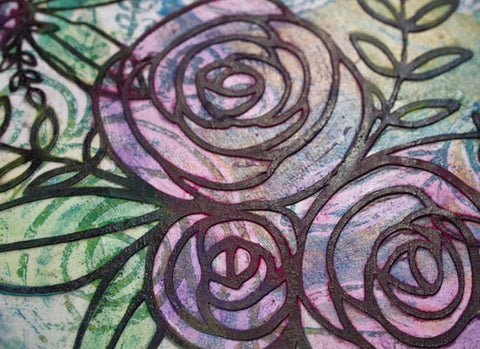
Using a Brother ScanNCut or another electronic cutting machine cut additional images of the Floral cut file from black cardstock. Using gel medium, add these die cuts to the art panel. Try overlapping the images and use one image that is larger than the others. This will add a focal element to the piece. Add gel medium to the Gelli print on the art panel, then place the floral image on the panel. Cover the top of the die cut with gel medium to seal it to the panel. Set aside to dry completely.
Adding Pan Pastels to the Flowers

To add color to the flowers, we’re going to use Pan Pastels. Using Sofft tools, apply Magenta and Violet Pan Pastels onto the flower images. By adding layers of pastel to the surface, this will give soft, translucent color to the images. To color the leaves, start with Bright Yellow Green and add in some Phtalo Green Extra Dark to add in some darker tones. For a more detailed tutorial on Pan Pastels, what they are and how to use them, visit this link.
Sealing Your Artwork
Make sure to seal your artwork before displaying your piece. You can either use a Workable Fixative to set the pastel or an Archival varnish that seals and protects your piece from UV fading.
Wild Whisper Designs Supplies:
If you would like to get a discount on your next Wild Whisper Designs order, please use DTNADINE when ordering.
I hope that you have enjoyed this project and that you take some time this weekend for some creative self-care. I would love to hear what you think about this project. Feel free to drop a note if you have any questions about the techniques. Continue to keep visit the blog for more creative inspiration. Have a great weekend!