

Hey Wild Whisper Fans, Katelyn here! For today's post, I created this So Much World Suitcase Mini Album. To create my mini album, I've used the Where to Next? Collection. You'll want to grab a cup of your favourite beverage and learn how to recreate my So Much World Suitcase Mini Album at home.
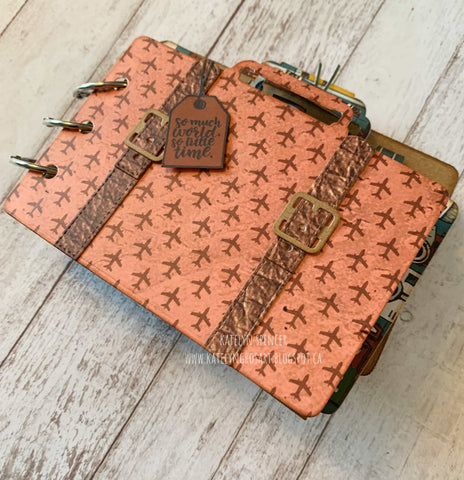
For the front cover, you'll need the airplane paper out of the Where to Next? 12x12 Paper Pack. Die cut the suitcase from the Pack Your Bags die out of the patterned paper. Next, you'll need the leather looking paper and die cut the straps from the Pack Your Bags die out of it. Die cut the belt piece out of a piece of kraft cardstock. Fussy cut the small tag out of the cut apart paper. Ink the edges of all of the pieces using Walnut Stain Distress Ink and a blending tool with foam. Attach the straps to the front of the suitcase. Add the belt piece to each of the top straps. Adhere each top strap to the the straps. Adhere the small tag to which ever strap you desire.
Page 1. Choose a border strip from the bottom of one of the patterned papers and cut it down to 4 5/8". Cut a piece of kraft cardstock to 2 1/2" x 3 3/4". Round the corners. Distress the edges of the cardstock piece. Ink the edges of all of the pieces using Walnut Stain Distress Ink and a blending tool with foam. Adhere the border strip 1/4" from the bottom of the backside of the front cover suitcase. Adhere the kraft cardstock piece as desired on the suitcase.
Page 2. Die cut the stitched banner from the Pack Your Bags Die out of a piece of kraft cardstock. Ink the edges using Walnut Stain Distress Ink and a blending tool with foam. From the Where to Next? Card Pack, you'll need to cut the yellow airplane card to 2 7/8" x 3". From the card pack fussy cut the globe out as well as the adventure word. From the Cut apart paper, fussy cut the large camera out. Distress the edges of the airplane paper. Ink the edges of all of the pieces using Walnut Stain Distress Ink and a blending tool with foam. Adhere the airplane paper to the middle of the stitched banner. Use foam squares to adhere the globe to the left side of the airplane paper. Use adhesive and foam squares to adhere the camera to the right of the globe. Adhere the adventure word to the bottom of the camera. Adhere five sequins out of the Where to Next? Sequins.

Page 3. Flip the stitched banner over. From the camera patterned paper, cut a piece that measures 1" x 3". Cut a piece from the airplane paper that measures 2 1/4" x 2". From the cut apart paper, cut out the Photos square. Cut the square down to 1 3/4" x 2". From the circle paper, fussy cut one of the circles out. Distress the edges of all of the pieces except the circle. Ink the edges of all of the pieces using Walnut Stain Distress Ink and a blending tool with foam. Foam square the camera strip to the middle of the banner. Adhere the circle to the middle of the camera strip. Adhere the Photos quote to the airplane paper. Adhere the airplane paper to the middle of the circle.
Page 4. Die cut two suitcases out of the camera paper, one of suitcases will be the backside of this suitcase we are going to embellish. Ink the edges of both suitcases using Walnut Stain Distress Ink and a blending tool with foam. Adhere the two suitcases together.
Choose a border strip from the bottom of one of the patterned papers and cut it down to 4 5/8". Cut a piece of kraft cardstock to 2 1/2" x 3 3/4". Round the corners. Distress the edges of the cardstock piece. Ink the edges of all of the pieces using Walnut Stain Distress Ink and a blending tool with foam. Adhere the border strip 1/4" from the bottom of the suitcase. Adhere the kraft cardstock piece as desired on the suitcase.

Page 5.
Choose a border strip from the bottom of one of the patterned papers and cut it down to 4 5/8". Cut a piece of kraft cardstock to 2 1/2" x 3 3/4". Round the corners. Distress the edges of the cardstock piece. Ink the edges of all of the pieces using Walnut Stain Distress Ink and a blending tool with foam. Adhere the border strip 1/4" from the bottom of the suitcase. Adhere the kraft cardstock piece as desired on the suitcase.
Page 6. Die cut a suitcase out of a piece of kraft cardstock. Trim off the handle of the suitcase. Ink the edges of the kraft cardstock piece using Walnut Stain Distress Ink and a blending tool with foam. From the Where to Next? Card pack, you'll need the blue postage stamp and the cobbled streets word strip. Fussy cut the postage stamp out. Cut the Cobbled Streets word strip into two strips. From the cut apart paper, fussy cut the stacked suitcases out. Ink the edges of the stamp, stacked suitcases and word strips using Walnut Stain Distress Ink and a blending tool with foam. Foam square the stamp to the middle of the kraft suitcase piece. Use foam squares to adhere the stacked suitcase to the left hand side of the stamp. Use adhesive and foam squares to adhere the Cobbled Streets word strips to the right of the stacked suitcases.

Page 7. Flip the kraft suitcase piece over. Cut a strip from the multi coloured postage stamp patterned paper that measures 3/4" x 4". Fussy cut a circle out of the patterned paper. From the cut apart paper, fussy cut the airplane out. From the Where to Next? Card Pack, fussy cut the So Much World tag out. Distress the edges of the postage stamp piece. Ink the edges of all the pieces using Walnut Stain Distress Ink and a blending tool with foam. Adhere the postage stamp piece to the middle of the suitcase piece. Foam square the circle to the middle of the postage stamp piece. Adhere the airplane to the bottom right side of the circle. Adhere the So Much World Tag to the middle of the circle, making sure the bottom portion of the airplane sits over top of the tag.
Page 8.
Die cut a suitcase out of the suitcase patterned paper. Ink the edges of the suitcase using Walnut Stain Distress Ink and a blending tool with foam. Choose a border strip from the bottom of one of the patterned papers and cut it down to 4 5/8". Cut a piece of kraft cardstock to 2 1/2" x 3 3/4". Round the corners. Distress the edges of the cardstock piece. Ink the edges of all of the pieces using Walnut Stain Distress Ink and a blending tool with foam. Adhere the border strip 1/4" from the bottom of the suitcase. Adhere the kraft cardstock piece as desired on the suitcase.

Page 9. Flip the suitcase page over.
Choose a border strip from the bottom of one of the patterned papers and cut it down to 4 5/8". Cut a piece of kraft cardstock to 2 1/2" x 3 3/4". Round the corners. Distress the edges of the cardstock piece. Ink the edges of all of the pieces using Walnut Stain Distress Ink and a blending tool with foam. Adhere the border strip 1/4" from the bottom of the suitcase. Adhere the kraft cardstock piece as desired on the suitcase.
Page 10. Die cut a stitched banner out of a piece of kraft cardstock. Fussy cut a circle out from the patterned paper. From the Where to Next? Card Pack, you'll need the camera and So Much World Strip. Fussy cut the camera out. Cut the So Much World word strip into three strips. Ink the edges of the camera and word strips using Walnut Stain Distress Ink and a blending tool with foam. Foam square the circle to the middle of the banner. Adhere the camera to the middle of the circle. Adhere the word strips to the right of the camera as desired.

Page 11. Flip the stitched banner over. Cut a piece of suitcase patterned paper that measures 1" x 3 1/4". Distress the edges of the paper. From the Where to Next? Card Pack, you'll need the globe and Where to Next? Word Strip. Fussy cut the world out. Cut the Where to Next? word strip into three strips. Ink the edges of all of the pieces using Walnut Stain Distress Ink and a blending tool with foam. Adhere the suitcase patterned paper strip to the middle of the banner. Foam square the globe to the middle of the suitcase patterned paper. Adhere the three word strips to the middle of the globe as desired.
Page 12.
Die cut a suitcase out of the circle patterned paper. Ink the edges of the suitcase using Walnut Stain Distress Ink and a blending tool with foam. Choose a border strip from the bottom of one of the patterned papers and cut it down to 4 5/8". Cut a piece of kraft cardstock to 2 1/2" x 3 3/4". Round the corners. Distress the edges of the cardstock piece. Ink the edges of all of the pieces using Walnut Stain Distress Ink and a blending tool with foam. Adhere the border strip 1/4" from the bottom of the suitcase. Adhere the kraft cardstock piece as desired on the suitcase.

Page 13.
Flip the suitcase page over. Choose a border strip from the bottom of one of the patterned papers and cut it down to 4 5/8". Cut a piece of kraft cardstock to 2 1/2" x 3 3/4". Round the corners. Distress the edges of the cardstock piece. Ink the edges of all of the pieces using Walnut Stain Distress Ink and a blending tool with foam. Adhere the border strip 1/4" from the bottom of the suitcase. Adhere the kraft cardstock piece as desired on the suitcase.
Page 14.
Die cut a suitcase out of a piece of kraft cardstock. Trim off the handle of the suitcase. Ink the edges of the kraft cardstock piece using Walnut Stain Distress Ink and a blending tool with foam. From the suitcase patterned paper, cut a piece that measures 1" x 4". Distress the edges of the paper. Fussy cut a circle out of the circle patterned paper. From the cut apart paper, fussy cut a small square camera out. From the Where to Next? Card pack, you'll need the tall brown camera out and the So Little Time word strip. Fussy cut the tall brown camera out. Cut the So Little Time word strip into three strips. Ink the edges of the pieces using Walnut Stain Distress Ink and a blending tool with foam. Adhere the suitcase patterned paper strip to the middle of the suitcase piece. Foam square the circle to the middle of the suitcase patterned paper strip. Use adhesive to adhere the cameras as desired on the circle. Use adhesive to adhere the So Little Time word strips to the right of the cameras. To finish the page, add five sequins out of the Where to Next? Sequins as desired.

Page 15. Flip the kraft suitcase over. From the airplane patterned paper, cut a piece that measures 1" x 4". Distress the edges. Fussy cut a circle out of the circle patterned paper. From the cut apart paper, fussy cut the stacked suitcases out. From the Where to Next? Card Pack, you'll need the postage stamp with quote. Cut the quote into 5 strips. Adhere the airplane patterned paper piece to the middle of the suitcase. Foam square the circle to the middle of the airplane patterned paper piece. Use adhesive to adhere the stacked suitcases to the middle of the circle. Use adhesive to adhere the quote word strips to the right of the stacked suitcases as desired. To finish the page, adhere five sequins from the Where to Next? Sequins as desired.
Page 16.
Die cut a suitcase out of the airplane patterned paper. Ink the edges of the suitcase using Walnut Stain Distress Ink and a blending tool with foam. Choose a border strip from the bottom of one of the patterned papers and cut it down to 4 5/8". Cut a piece of kraft cardstock to 2 1/2" x 3 3/4". Round the corners. Distress the edges of the cardstock piece. Ink the edges of all of the pieces using Walnut Stain Distress Ink and a blending tool with foam. Adhere the border strip 1/4" from the bottom of the suitcase. Adhere the kraft cardstock piece as desired on the suitcase.

To finish the mini album, add three jump rings through the holes.
Wild Whisper Supplies Used:
Other Supplies Used:- Tim Holtz for Ranger Ink: Distress Ink - Walnut Stain and Blending Tool with foam
- Elizabeth Craft Designs: Pack Your Bags Die Set
- Misc: Kraft Cardstock and Jump Rings
I hope that I’ve inspired you to recreate my So Much World Suitcase Mini Album. For a discount on any of the products I've used today, make sure to use code: DTKATELYNG Make sure to continue to stop by the blog as the design team has loads of inspiration for you!
