

Hey Wild Whisper Fans, Katelyn here! For today's post, I created this Sweet Little One Tag. To create my tag, I've used the digital printable - Sweet Little One, sequins from the Where to Next? Collection and the Honeycomb Flair Stencil by Pam Bray Designs. You'll want to grab a cup of your favourite beverage and learn how to recreate my tag at home.
To start, you'll need a tag that measures 3 1/8" x 5 1/2".

Next, you'll need the heart patterned paper that comes with the Sweet Little One Printable. Trace the tag around the patterned paper. Cut the tag out and punch a hole at the top of the tag. Place the Honeycomb Flair Stencil on the patterned paper tag. Using the palette knife to put Texture Paste Opaque Matte through the stencil as desired. Remove the stencil. Once the stenciled area has dried, ink the edges of the tag and patterned paper tag using Black Soot Distress Ink and a blending tool with foam.

Next, you'll need the rainbow card from the printable. Cut the rainbow card to 2 3/4" x 3 3/4". Fussy cut the remaining two rainbows out. Ink the edges of the rainbow card and fussy cut rainbows using Black Soot Distress Ink and a blending tool with foam.

Cut the You are card down to 2 1/2" x 3 1/2". Ink the edges of the card using Black Soot Distress Ink and a blending tool with foam.

Cut a piece that measures 2 1/4" x 3 1/4" from the heart patterned paper. Ink the edges of the paper using Black Soot Distress Ink and a blending tool with foam.

From the Sweet Little One Card, fussy cut the words out. Ink the edges of the words using Black Soot Distress Ink and a blending tool with foam.

Choose eight sequins out of the Where to Next? sequin pack.

Adhere the patterned paper tag to the tag.

Adhere the heart piece to the you are piece. Adhere the you are piece to the mustard piece. Foam square the mustard piece to the right hand side of the tag as desired.

Use adhesive and foam squares to adhere the fussy cut rainbows on the heart piece as desired. Use adhesive and foam squares to adhere the Sweet Little One words underneath the rainbows as desired.

Adhere the sequins around the rainbows and words as desired.

To finish the tag, tie a piece of twine through the hole at the top of the tag.

Here are a few closeups of the finished tag.
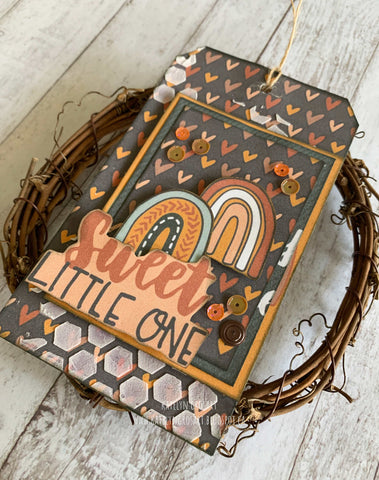

Here is the finished Sweet Little One Tag.
Wild Whisper Supplies Used:
Other Supplies Used:- Tim Holtz for Ranger Ink: Distress Ink - Black Soot and Blending Tool with Foam
- Ranger Ink: Texture Paste Opaque Matte
- Misc: Twine
I hope that I’ve inspired you to recreate my Sweet Little One Tag at home. For a discount on any of the products I've used today, make sure to use code: DTKATELYNG Make sure to continue to stop by the blog as the design team has loads of inspiration for you!
