

Hey Wild Whisper Fans, Katelyn here! For today's post, I created these Canadian Inspired Christmas Gift Tags perfect for adding to Christmas presents this year. To create my gift tags, I've used the Canadian Winter Collection. You'll want to grab a cup of your favourite Christmas beverage and learn how to recreate my gift tags at home.
To start, we'll make the deer tag.
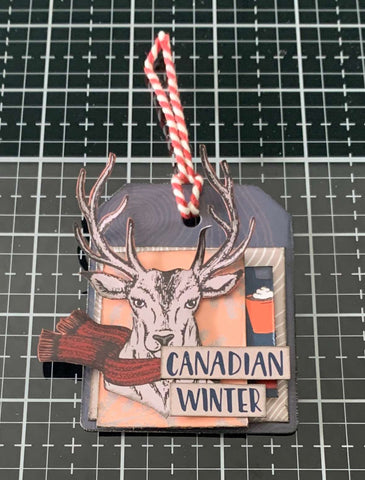
Die cut a 2 1/8" tag out of the blue woodgrain patterned paper. Distress the edges of the tag. Ink the edges of the tag using Black Soot Distress Ink and a blending tool with foam.

Next, you'll need to choose three pieces of patterned paper. Cut one piece to 2" x 2". Cut the second piece to 1 1/2" x 2". Cut the third piece to 3/4" x 1 1/2". Distress the edges of all three pieces. Ink the edges of all three pieces using Black Soot Distress Ink and a blending tool with foam.

Out of the Canadian Winter Double Card Pack, you'll need the deer with the scarf. Fussy cut the deer out. Ink the edges of the deer using Black Soot Distress Ink and a blending tool with foam.

From the bottom of the border strip that says Canadian Winter, cut the two words into two strips. Ink the edges of the two word strips using Black Soot Distress Ink and a blending tool with foam.

Adhere the 2" piece to the middle of the tag. Adhere the 3/4" strip to the right of the 1 1/2" piece, 1/4" to the right of the 1 1/2" strip. Foam square the 1 1/2" strip 1/8" from the left and 1 /8" from the top of the 2" piece.

Foam square the deer to the left hand side of the tag as desired. Use adhesive and foam squares to adhere the Canadian Winter word strips to the right of the deer.

To finish the tag, tie a piece of red and white twine through the hole at the top of the tag.
Next, we'll make the snowy day tag.
Die cut a 2 1/8" tag out of the cup patterned paper. Distress the edges of the tag. Ink the edges of the tag using Black Soot Distress Ink and a blending tool with foam.

Next, you'll need to choose two pieces of patterned paper. Cut one piece to 1" x 1 3/4". Cut the second piece to 1" x 2". Ink the edges of both pieces using Black Soot Distress Ink and a blending tool with foam.

Out of the Canadian Winter Double Card Pack, you'll need the hot cocoa mug and the 3x4 card that has the branches on it. Fussy cut the hot cocoa mug out. Cut the branches piece to 1 1/8" x 2 1/4". Distress the edges of the branches piece. Ink the edges of the mug and branches piece using Black Soot Distress Ink and a blending tool with foam.

From the Canadian Winter Flair, you'll need the snow day button.

Adhere the 1" piece to the branches piece making sure 1/2" is showing on the right hand side. Foam square the branches piece 1/8" from the left and 1/8" from the bottom of the tag.

Use adhesive and foam squares to adhere the cocoa mug to the right of the layered papers as desired. Adhere the snow day button to the bottom left of the cocoa mug.

To finish the tag, tie a piece of red and white twine through the hole at the top of the tag.

Now, we'll make the Skate tag.
Die cut a 2 1/8" tag out of the mitt and scarf patterned paper. Distress the edges of the tag. Ink the edges of the tag using Black Soot Distress Ink and a blending tool with foam.

Next, you'll need to choose two pieces of patterned paper. Cut one piece to 1" x 2". Cut the second piece to 7/8" x 2 1/4". Ink the edges of both pieces using Black Soot Distress Ink and a blending tool with foam.

Find the scarf border strip and cut it down to 2 1/2". Cut a notch at the end of the strip. Ink the edges of the strip using Black Soot Distress Ink and a blending tool with foam.

Out of the Canadian Winter Double Card Pack, you'll need the skate card. Fussy cut the skate out. Ink the edges of the skate using Black Soot Distress Ink and a blending tool with foam.

From the Canadian Winter Flair, you'll need the skate button.

Adhere the 1" piece to the 7/8" piece, 5/8" from the right of the 1" piece. Foam square the 7/8" piece 1/8" from the left and 1/8" from the bottom of the tag. Adhere the border strip 1/2" from the bottom and all the way to the left hand side of the tag.

Use foam square to adhere the skate to the middle of the tag as desired. Adhere the skate button to the bottom left side of the skate.

To finish the tag, tie a piece of red and white twine through the hole at the top of the tag.

Here are a few closeup photos of the finished gift tags.


Here are the finished Canadian Inspired Christmas Gift Tags.
Wild Whisper Supplies Used:
Other Supplies Used:- Tim Holtz for Ranger Ink: Distress Ink - Black Soot and Blending Tool with Foam
- Elizabeth Craft Designs: Planner Essentials - 2 (Tag)
- Misc: Red and White Twine
I hope that I’ve inspired you to recreate my Canadian Inspired Christmas Gift Tags at home. For a discount on any of the products I've used today, make sure to use code: DTKATELYNG Make sure to continue to stop by the blog as the design team has loads of inspiration for you!
